
Claude Code Installation and Your First Project: First Complete One Small, Verifiable Loop
| Difficulty | Reading time | Last verified | Author |
|---|---|---|---|
| Beginner | 12 minutes | 2026-07-11 | LearnPrompt Editorial Team |
When using Claude Code for the first time, the easiest success signal to misread is “it installed and can chat.”
That is not enough. A useful first-day success is having it, in a disposable Git project, inspect the project first, freeze the task, make one minimal change only, run a real check, and finally inspect git diff. If these five steps do not complete, installation only finished preparation.
What you will be able to do after reading
Section titled “What you will be able to do after reading”After reading, you should be able to complete this first loop independently:
- Install and verify Claude Code using the current official recommended path.
- Freeze your first task in one sentence to a scope small enough to accept.
- Have Claude Code inspect the project first and make a minimal change, rather than refactoring immediately.
- Accept results with exit codes, test results, and
git diff, not the model’s account of itself. - Summarize the first pitfall as one project rule for the next collaboration.
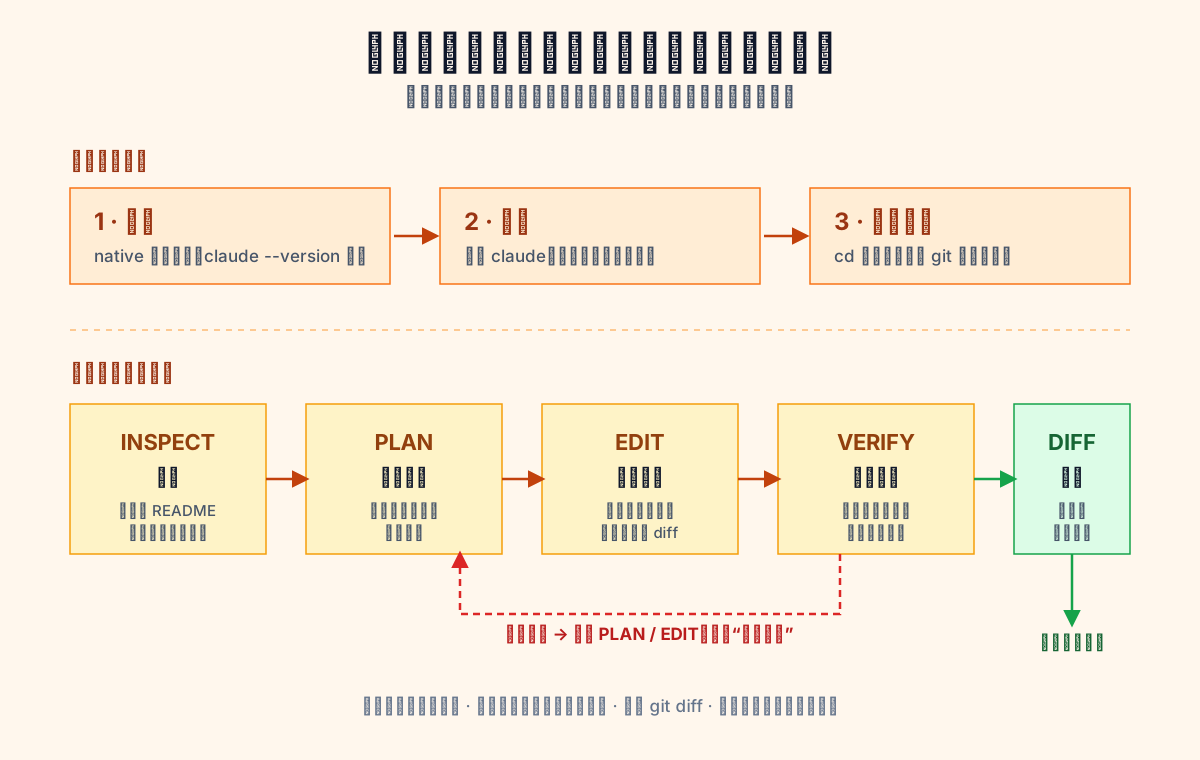 Caption: Installation, authentication, and entering a repository are one-time preparation. Every real collaboration returns to INSPECT→PLAN→EDIT→VERIFY→DIFF. When acceptance fails, do not keep forcing a fix; return to PLAN or EDIT.
Correct the success criterion first: not “the tool opens,” but “the task can be accepted”
Section titled “Correct the success criterion first: not “the tool opens,” but “the task can be accepted””The first two Quickstart steps are indeed installation and login, but real collaboration begins after entering a project directory, asking what the project does, and then making the first change. Official best practices add the critical point: give Claude a check that yields pass/fail, otherwise “looks done” is the only signal.
This article’s central judgment is:
First success is not
claude --versionproducing output. It is a minimal task completing INSPECT→PLAN→EDIT→VERIFY→DIFF, with VERIFY decided by an independent check.
Broken apart:
INSPECT: inventory read-only; do not edit files.PLAN: pin task scope and hard constraints in one sentence.EDIT: make only the smallest change.VERIFY: run tests or build and inspect the exit code.DIFF: confirm no wrong file changed.
This is half a step slower than “help me optimize the project,” but much safer and closer to the official Explore→Plan→Code→Commit path.
Step 0: install, log in, verify—only what you need today
Section titled “Step 0: install, log in, verify—only what you need today”As of 2026-07-11, the Claude Code official Quickstart marks Native Install as Recommended. For macOS, Linux, and WSL, the recommended install command is:
curl -fsSL https://claude.ai/install.sh | bashWindows has separate PowerShell and CMD variants. The official setup page also says that npm install -g @anthropic-ai/claude-code remains available, but is under Advanced installation options rather than the preferred first-day path.
After installation, perform two checks:
claude --versionclaude doctorThe local result used for this article was:
claude --version2.1.206 (Claude Code)Do not guess the login flow either. Quickstart currently asks you to start an interactive session first:
claudeThe first run guides browser authentication; use /login in a session later to switch accounts. Its purpose is simple: confirm your account actually works before discovering unfinished authentication during the first file change.
Do not choose a “big job” for the first project; choose a disposable small repository
Section titled “Do not choose a “big job” for the first project; choose a disposable small repository”A first practice project should meet four conditions:
- It is already a Git repository.
- It has a clear entry point such as
README.md,package.json, orMakefile. - It has at least one mechanically executable check command.
- It contains no real secrets, production configuration, or irreversible data.
Why a small project? First-day learning is the process, not getting a model to complete a large feature in one bite. Official best practices offer a key observation: if you can explain a diff in one sentence, you may not need a long plan. The first task should be this small.
The best first target is often not “help optimize the project,” but:
Add a local-start section to the README and ensure the existing check still passes.It has advantages:
- The result is visible.
- The change surface is naturally small.
- Hard constraints are easy to state.
- Tests and
git diffprovide double acceptance.
Freezing the task in one sentence matters more than writing a long prompt
Section titled “Freezing the task in one sentence matters more than writing a long prompt”First failure is often not that the model cannot write a README, but that task boundaries were not pinned. Rather than writing a long background, make the frozen task clear first.
The Showcase uses this frozen task:
Complete README.md with a local-run section (install / run CLI / run tests).Hard constraints: do not alter code logic (leave wordcount.js and test.js unchanged), add no dependencies, and edit README.md only.This has three layers:
- It names the target file:
README.md. - It names the task: local-run instructions.
- It names prohibitions: no code changes, no dependencies.
Do not ask it to write immediately. Ask for inventory first. A sufficient first-turn prompt is:
Do not change files yet. First read the root README, package files, and directory structure.
Then tell me:1. What this project does.2. What local-run or check commands might be.3. Where you would start if making only one minimal change.4. Which files you expect to read; do not exceed 8.
This is INSPECT. Its goal is not displaying intelligence but building a map. In an unfamiliar repository, read-then-edit is almost always cheaper than edit-then-repair.
How to run the five-step loop
Section titled “How to run the five-step loop”This table is the most practical order for first use:
| Step | What you do | Why it is arranged this way |
|---|---|---|
| INSPECT | Have Claude read only the README, scripts, and directory structure | Build a map first and avoid irrelevant changes |
| PLAN | Freeze scope and hard constraints in one sentence | Turn “complete” into a decidable target |
| EDIT | Approve only the smallest change | Small diffs are easiest to review and roll back |
| VERIFY | Run test/build and inspect exit code | Acceptance does not rely on model narrative |
| DIFF | View git diff and changed-file list | Prevent a README task from casually changing code |
If you want to be even more conservative, switch to plan mode during exploration. The official permission-modes page gives three entry points: cycle with Shift+Tab, prefix a message with /plan, or launch directly:
claude --permission-mode planPlan mode is not “more advanced”; it makes the first inventory read-only. Once scope is clear, return to the default manual-approval mode for edits. This is more stable.
For permissions, remember only the minimal first-day set. Official permissions documentation gives evaluation order deny → ask → allow. That means:
- Do not start with a broad
allow. - Explicitly deny genuinely dangerous commands such as
git push. - Only gradually allow harmless check commands you know will run frequently.
This article does not expand a complete permission design because the first loop teaches “tighten first, then open by evidence.”
Real Showcase: a small README change, but acceptance is not “it says it is done”
Section titled “Real Showcase: a small README change, but acceptance is not “it says it is done””To avoid empty theory, this tutorial includes one real run. The research pack is at research/articles/install-and-first-project/showcase/ and contains four kinds of key evidence:
- A real README diff excerpt:
readme.diff. - A redacted run summary:
run-summary.txt. - A deterministic acceptance script:
verify-first-loop.mjs. - Passing and failing output from that gate:
gate-output.txt.
The practice repository is a tiny CLI that only counts words. Its initial README intentionally lacks local-run instructions. It has three first-day-friendly properties:
npm testalready exists and can directly perform VERIFY.- The code is small, so scope violations are obvious.
- The README change is small enough to distinguish easily from code logic.
In the actual run, the frozen task invoked Claude Code in non-interactive mode:
claude -p "<frozen task>" \ --permission-mode acceptEdits \ --allowedTools "Read Edit Bash(npm test) Bash(git diff)" \ --model claude-haiku-4-5-20251001This command is for one restricted non-interactive archived run, not the default posture for a beginner’s first interactive run. Here, acceptEdits lets one command complete a candidate change while --allowedTools is restricted to reading, file editing, npm test, and git diff; your first interactive use should still be manual/default, with an unfamiliar repository inventoried in plan first.
The archived environment used an already configured API key rather than the browser login described above for subscription users. This changes only the authentication entry; it does not change the subsequent permissions, scope, acceptance, or diff loop. Your own first-day installation should follow the Quickstart account path that applies to you.
This real run left three key facts:
- The
claudeprocess exit code was0. npm testpassed.- The real diff changed only
README.md, adding local-run instructions and not touchingwordcount.js,test.js, orpackage.json.
The core diff is simple: it adds instructions for npm install, node wordcount.js "hello world", npm link, and npm test. It is not “beautiful copy,” but one verifiable small change.
Why add another deterministic acceptance gate
Section titled “Why add another deterministic acceptance gate”If you have only the model’s narrative, you still must guess whether it crossed scope. Official best practices emphasize providing Claude a pass/fail check it can run. This Showcase adds a second layer: first tag the initial commit with an immutable baseline, then always compare the candidate against that tag. Even if the candidate is later committed, out-of-scope code changes cannot disappear merely because HEAD advanced.
The passing gate command is:
node verify-first-loop.mjsIts real output is:
PASS no-code-edit: code/config match baselinePASS readme-run-section: local-run instructions added vs baselinePASS check-passes: npm test exit 0SUMMARY: 3/3 acceptance checks passedThe three checks respectively confirm:
- Code and configuration exactly match the
baselinetag. - README has gained local-run instructions relative to
baseline. npm testexits 0.
More importantly, the research pack preserves a failure path. After deliberately adding two harmless lines to wordcount.js, npm test still passes, but the gate immediately reports:
FAIL no-code-edit: frozen files differ from baseline: wordcount.jsSUMMARY: 2/3 passed — task NOT accepted, return to PLAN/EDITThis is the first-day habit the article teaches: a passing test does not mean the task is accepted; also check whether it changed files it was not allowed to change.
What this Showcase proves
Section titled “What this Showcase proves”- A real Claude Code session can produce a minimal diff under frozen constraints.
- A first task can be a low-risk README change rather than code refactoring.
- An acceptance gate can independently accept or reject using exit codes and diffs, rather than model narrative.
What it does not prove
Section titled “What it does not prove”- It does not mean a large real repository succeeds in one attempt.
- It does not mean every model writes the same README wording.
- It does not mean copy quality is necessarily sufficient just because tests pass.
The Showcase’s status is therefore clear: it proves the loop can run, not a league table of model ability.
How to handle failure, and when not to use this approach
Section titled “How to handle failure, and when not to use this approach”The four most common first-use mistakes are:
- Asking it to “help optimize” before inventorying the project.
- Not freezing scope, so a README task casually changes code.
- Looking only at the model summary, not exit codes and
git diff. - After correcting the same error two or three times, continuing to force repairs in the original session.
Official best practices give useful advice for the fourth point too: if you have corrected the same problem twice and it remains unresolved, clear context and restart with a more specific prompt. For beginners, this costs less than adding more and more corrections atop a wrong premise.
This loop should not be copied blindly for every scenario:
- For one typo whose diff you can explain in one sentence, a separate long plan is unnecessary.
- For a one-off toy experiment with no Git, there is no need to force the complete loop.
- A repository containing real secrets, deployment scripts, or production data is unsuitable for first-day practice.
The most suitable first-day difficulty is not “challenging”; it is “fully reversible if it fails.”
What to leave after the first run
Section titled “What to leave after the first run”If this practice is effective, leave at least four things:
- One minimal change.
- One real acceptance command and its exit code.
- One
git diff. - One lesson written back as a project rule.
The project rule need not be long. For example:
- Before editing, read README and package files.- Prefer small, reviewable diffs.- State the exact files you plan to change before editing.- Run the fastest relevant check after behavior changes.This writes back only habits verified effective in the first run; it does not expand a complete CLAUDE.md design. That is the next article’s topic.
Exercise: apply the same loop to your own repository
Section titled “Exercise: apply the same loop to your own repository”Find a practice repository you are willing to discard completely and do this:
- Run
claude --versionandclaude doctorto confirm installation and environment. - Select a one-sentence task: add README text, add usage, or fix a typo.
- Have Claude inventory read-only first; do not allow file edits.
- Then provide a frozen task and hard constraints, allowing only the smallest change.
- Run one real check command, then inspect
git diff.
Completion criteria must be observable:
- You can name which files it read.
- You can explain why it changed only these files.
- You have an acceptance result that is intelligible whether passing or failing.
- On failure, you know to return to PLAN/EDIT rather than append vague requests.
Sources and further reading
Section titled “Sources and further reading”- Claude Code Quickstart: current recommended installation path, first login, first Q&A, first change, and
Shift+Tabpermission-mode switching. - Claude Code Setup: system requirements,
claude --version/claude doctorverification, and npm under Advanced installation options. - Claude Code Best Practices: Explore→Plan→Code→Commit, giving Claude a pass/fail check, and restarting after more than two similar corrections.
- Choose a Permission Mode: meanings and entry paths for
manual,plan,acceptEdits, and other modes. - Configure Permissions: evaluation order
deny → ask → allow, and command allowlist/denylist syntax. - This article’s research pack and Showcase: real diff, failure path, teaching diagram, evidence ledger, and control-verification record.
- Claude Code Orange Book: retained only as a Chinese thematic map with attribution and link, under CC BY-NC-SA 4.0; current product behavior and commands in this article have been rechecked against official material and local CLI.